In the previous article, you learned about ORTHO and Polar Tracking. In this article, you will learn two more AutoCAD features, namely Grid and Grid Snap.
Let’s begin with GRID.
A. GRID
GRID is an AutoCAD feature that serves as a visual aid to help users align objects and visualize distances. This grid is not plotted. It simply serves as a reference background that displays regularly spaced lines or points.
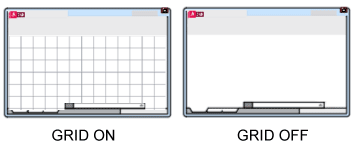
The GRID feature can be turned on or off by clicking the Grid Display button ![]() on the Status Bar or by pressing F7 on the keyboard.
on the Status Bar or by pressing F7 on the keyboard.
Look at the difference between GRID turned on and off in the illustration below.
You can adjust the spacing between grid lines by right-clicking the Grid button in the Status Bar and selecting “Grid Settings”. This will open the Drafting Settings dialog box under the Snap and Grid tab. It looks like the image below:
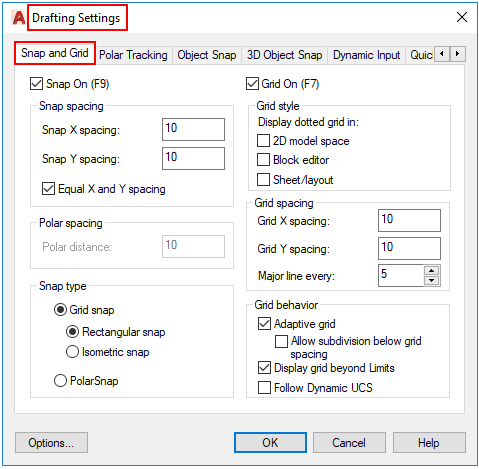
The dialog box above contains Snap and Grid settings. The Grid settings are on the right side.
From these settings, you can adjust the Grid X Spacing, Grid Y Spacing, and Major Line Interval. Major lines are the thicker grid lines.
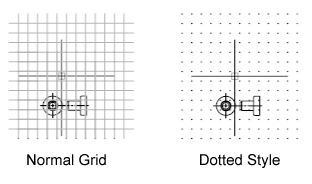
If you want to change the Grid’s appearance to dots, the settings are in the Grid Style section. You can also choose whether the dotted grid is displayed; in the 2D Model Space, Block Editor, or Sheet/Layout.
You can see the difference between a normal Grid and a Grid with a dotted style in the image below.
B. Grid Snap
The Grid Snap feature restricts cursor movement to a specified grid spacing, preventing it from moving freely across the drawing area while executing commands.
The purpose of using Grid Snap is to ensure lines and objects are aligned and spaced correctly, resulting in a more accurate drawing.
The Grid Snap feature can be turned on or off by clicking the Grid Snap button ![]() on the Status Bar or by pressing F9 on the keyboard.
on the Status Bar or by pressing F9 on the keyboard.
To set the Grid Snap spacing, right-click the Grid Snap button on the Status Bar and select “Snap Settings”. This will open the Drafting Settings dialog box under the Snap and Grid tab.
This is the same dialog box used for the Grid settings discussed in Part A.
The Snap settings are on the left side. There, you can adjust Snap Spacing and several other settings. To use this feature, make sure you select Grid Snap in the Snap Type section.
Leave a Reply